I got all the information and many great tips of websites of other coilers and have borrowed many ideas. I will try to remember and credit as much as I can.
I started off by getting this neon transformer
its a 10kV 50mA F.A.R.T. (oh the fun!) Resinblock. Here is my first try out of it, making a Jacobs ladder from coat hanger wire....
So far so good...
After a bit of online reading I eventually decided to wind my secondary coil on 125mm PVC ducting pipe (After deciding the 68mm drainpipe I first bought was just too wimpy). I got a nice 2Kg reel of 0.71mm magnet wire from ebay and got winding. I initially rigged up a motor driven jig to wind the wire but ended up winding by hand so I could keep a good tension on the wire (The motor came in very useful later while varnishing). I wound 800 turns in a couple of hours then put on about 5 coats of polyurethane gloss varnish. I used kapton tape to secure the outer windings (I owe http://deepfriedneon.com/ for many tips I used ... given my DIY prowess, without this information I would have ended in disaster I am sure)
Here is my winding rig...
I was quite pleased with the end result, which looked nicely like something from a B-movie mad scientists lab.
I originally bought 6mm microbore copper tubing to make my primary coil, but realised that I had not bought enough, and it was rather too expensive to go and buy another, longer length, so I looked around for alternatives and found some 4.75mm solid aluminium wire at the much better price of £12 for 20 metres. The wire was a lot softer and easier to kink than I expected and at first I wasn't too happy with the result. But after some reworking I think its OK. Here is the result (set on MDF with acrylic stands secured with nylon zipties)
I managed about 17 turns. I think I need to tap the coil after about 10 turns based on what Tesla Coil CAD told me - but I thought it would be good to have the extra tunability offered by the extra coils
For the top load I got some 10mm semi-rigid aluminium ducting hose (as is a coiler traditional I believe) and set it between two 34cm steel trays from the local 99p shop (these have to be the best bargain of this build!). This whole procedure was more difficult than it probably sounds... I needed to bolt the trays together first, with a wood spacer, then use tensioned strips of gaffer tape to hold the 2 plates parallel to each other. Then I threaded a rubber bungee cord through the flexible duct and after putting the ducting around the rim of the trays I hooked up the bungee and spread the out ducting round the rim until it joined up. I used a bit of flexible plastic sheet to make a sleeve to put inside one end of the ducting and help join the ends together. A bit of aluminium tape joined the ends, then more aluminimum tape to secure the ducting on the rim of the trays (helpful tips from http://www.hvtesla.com/toroid.html)
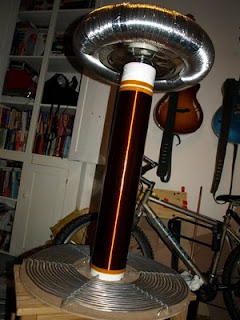
It might not be the best looking toroid, but it does look pretty meaty and mean!
Next steps are to add a strike rail to the primary (finally getting some use out of that microbore copper pipe), build a chassis (in progress - out of chipboard and softwood) and add fittings to secure it all together properly without danger of it collapsing. In the mean time here are the parts stacked on top of each other for a photo opportunity....
And so onto the electrics... I threw caution to the wind and got some Cornell Dubilier 942C20P15K-F capacitors, which a bit of online research seemed to indicate were THE choice for a good coil, even though they are not cheap, especially when factoring postage from US to UK. My capacitor bank has 28 of these 0.15uF, 2000V capacitors arranged in two parallel strings of 14. I mounted them on clear acrylic and wired them up with 1M bleeder resistors using high current wire taken from a set of car jump leads.
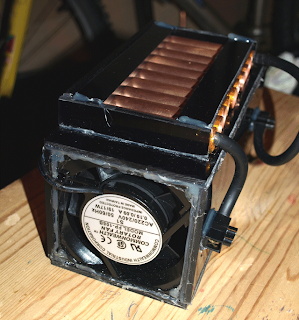
I just made my spark gap this weekend... I initially intended making a cylindrical "Richard Quick" type design but I preferred the idea I saw on a web site (which I would credit if I could find it again) where the multiple copper tubes are laid out side by side on the top of a box, and air is drawn through them by fans mounted on the ends of the box. Airflow keeps the gaps cool, but also sucks away ionised air from the gaps and quenches the sparks more quickly, which (so I read) results in better operation of the coil.
I made the spark gap box from acrylic sheets with an 85mm 240VAC fans (from Maplin) mounted at each end. 10 copper tubes of 15mm diameter and 90mm length form the gap. Two layers of kapton tape at each end of each copper tube provide spacing of ~0.4mm between tubes when they are laid side by side. Connection is made (at the moment) by a plug of compressed aluminium foil around which is wound the connection wire (car jump lead) inside the two "terminal" tubes. I am not sure how well this arrangment is going to work... we shall see.. The tubes are not permanently attached to the box, so my idea is that the number of tubes included in the gap can be varied by moving one of the tubes to which the wire is attached (the other being fixed at one side) by simply removing and shuffling the tubes.
I still need to complete build of the Terry Filter circuit (which I hope will protect the neon transformer from voltage surges) as well as the structural bits and pieces, however I hope I can get this thing up and running before too much longer. Watch this space for the results....


No comments:
Post a Comment